I enjoy painting miniatures for my board games. I have been painting minis since my days of playing Dungeons and Dragons and found it to be a relaxing way to spend a cold winter afternoon.
That being said, I sometimes get intimidated when it comes to board game armies (or any other masses of figures). For games like Adrenaline or Fallout, I’m happy to paint the 4-5 minis at my leisure. However when you get to games with lots of minis, like Zombicide or Cry Havoc, the piles of plastic can be a little intimidating.
So, it’s with these types of games in mind that I’ve created this article. What we are going for is quickly getting paint on a large amount of miniatures, yet still maintaining a level of quality in the results.
While these minis obviously won’t be award quality, they should still look good enough for tabletop play. Which is what we are shooting for. We aren’t master artists, just gamers looking to use something other than that drab grey plastic. In the mini painting world, it’s called “Tabletop Quality” and it’s perfect for our needs.
How to Quickly Paint Board Game Miniatures
Step 1: Prime the Miniatures
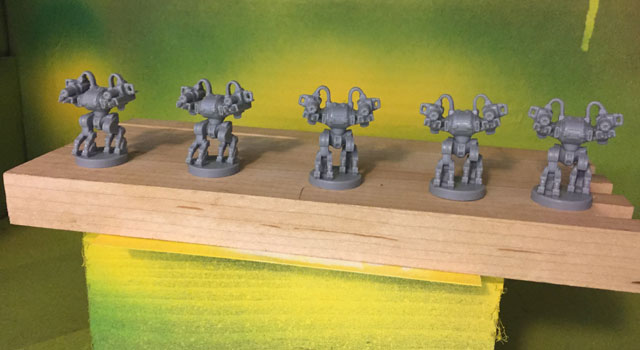
Many people recommend washing your minis with soap and water before you start incase there is any mold release from the factory left on the minis. But when you are ready to start with the paint, priming is the first and one of your most crucial steps. Priming your minis will help the actual miniature paint adhere better. Normally, I prime miniatures in either black or white paint. White is better for getting more vibrant colors, but black hides mistakes better (such as that little nook you missed). Black is also a bad choice if the main color of your minis are yellow, pink, or red as it will take MANY coats of paint to cover up that black.
However, when going for speed, black or white might not always be the best choice. What you want to do is figure out what color the majority of your minis will be. Unlike unique hero minis who often have tons of clothes, weapons, and accessories; many army miniatures look pretty similar to each other and don’t have a ton of intricate detail. Priming with a dominant color will allow you to skip having to apply color to large sections of your miniature, saving you valuable time.
So, if you are painting a large group of orcs or Trogs, prime them with green. The minions from Mechs vs Minions? Use a red primer. For our example, I will be painting the Machine faction from Cry Havoc. As they are the red faction, I’ve decided to go with a red primer to help them stay true to their color palette.
I use Army Painter primer for two reasons. First, it’s high quality. I tried using a cheap-o primer from Home Depot and it ended up being a disaster. I had to spend an hour stripping all the paint off and before I could start fresh.
The second is that all their primer has matching color bottles, which will help with the next step…
Step 2: Touch Ups
After your primer has dried, you want to check your miniatures for spots the primer has missed. If you are in a hurry, you can skip this step. Chances are, nobody will look in those little crevices anyway. For me, I like to take the 10-15 seconds per mini it takes to dab some paint on those recessed areas, such as nooks or overhangs, that the primer missed.
Step 3: Major Details
Now it’s time to make some decisions. You have a solid color mini which is already better than grey. So, take a look at your miniatures and figure out what needs to be a different color. The obvious things will be clothing, weapons, hair, etc… It’s really up to you. But just remember, we are going for speed here. So, try not to be too picky. If you are painting an orc, maybe color the weapon and armor and call it a day.
The other key is to make them uniform. While it may be tempting to paint each of your 20 zombies wearing a different colored outfit, it will greatly slow you down to have to constantly pull out different colors of paint. Pick a color, paint all the minis that need that color in the proper areas, then move on to the next color. Just like an assembly line. Be aware that it may take you more than one coat of paint, depending on the hue of the color you choose. Yellow paint is notoriously hard to cover up other colors with.
Step 4: Wash
Once you are satisfied that your minis have color in all the right places, it’s time to move on to the wash. Next time priming, this step is probably the most crucial. A good wash will give your minis some shading and proving contrast, which will make the miniature look so much better. Trust me on that one.
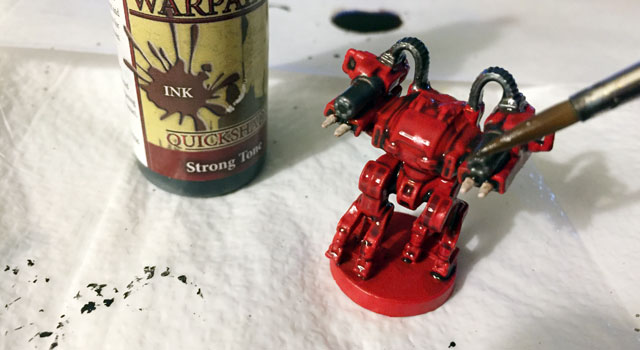
Again, I’m turning back to Army Painter (feel free to use any brand you like). They make a lot of washes, but the three main ones I use are Strong, Light, and Dark Tone. If you were only to get one, Strong is probably the most versatile. Choose the shade tone appropriate for the color scheme of your mini.
There are two ways to apply the shade. The quickest way is to buy the small cans of the shade and actually dip your mini in it and then set it somewhere to dry. You’ll be done in a few seconds.
I’m a bit more finicky than that, so I brush mine on. It takes about 10-20 seconds per mini, but it allows me to control the flow a lot better. Sometimes I want more shade in specific areas. Again, if you are going for speed, the dip method is fine.
Step 5: Dry Brushing
This step can be optional, depending on your preference and the color of your miniature. Dry Brushing is a very easy way to add highlights to a miniature. However, I have found that dry brushing works much better on darker colored minis. So, if you are painting a stormtrooper or the yellow robot (D-STRUCT-0R) from Adrenaline, you can probably skip this step, as the results will be fairly minimal.
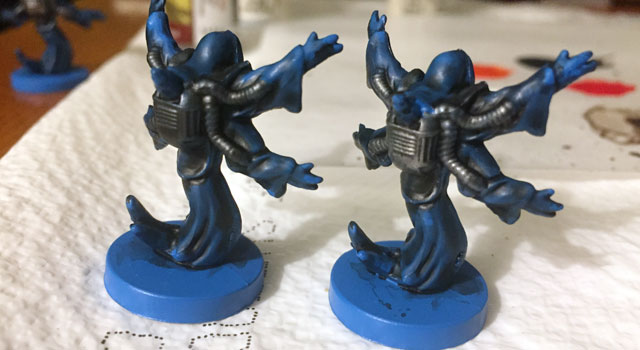
However, for dark minis, such as the green Trogs from Cry Havoc, this step can really improve the final look. To dry brush, choose a paint color lighter than the one on the miniature. Add paint to your brush, and then rub most of it off on a paper towel. Do this a couple of times until you have a nice dry brush with some color still on it. Then flick it back and forth across your mini in the areas you want to highlight. Even though your brush is dry, the mini will still catch residual paint from the brush on its raised areas. This will produce a nice highlighting effect that will work in a perfect contrast to your dark shade. The key is to not overdo it on the paint. If you don’t get the majority of the paint off your brush, you may leave uneven globs on your mini.
I didn’t end up dry brushing these Machine minis because the result after one try was fairly negligible and not worth the time. However, I wanted to provide you an example, so I took a photo from the Pilgrim faction. In the photo above, the backpack on the mini on the right was dry brushed, the one on the left wasn’t. As you can see, the one on the right looks a lot better.
Step 6: Basing
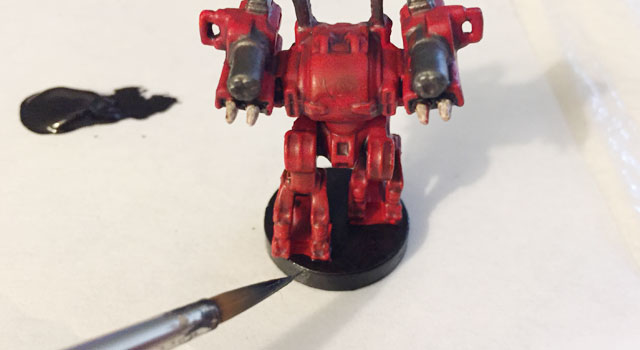
Your mini is basically done now. For its base, you can go as wild or as simple as you like. For armies, I usually just paint the base black and call it a day. Adding terrain can be a lot of work and it’s usually not worth it when you are going for speed. And if you are truly not picky, you can even skip this step depending on how much you slopped up the base during the painting process. If it doesn’t look messy, feel free to move on. Again, I’m a bit particular, so I always clean up my bases by painting them a neutral color.
Step 7: Sealing
This is the last step and pretty important. Get a nice spray sealer. I’ve had good luck with Testors DullCoat. I bought it once in a rush from Hobby Lobby and it worked great, so it’s my go to choice now. Again, avoid cheap stuff here. I had to reseal a bunch of minis that ended up becoming sticky after a few months from using a sub-par sealer.
The main purpose of the sealer is to protect your minis. This will help avoid the paint chipping off as you bang the minis around.
Personally, I prefer a matte sealer. Gloss ones never look very realistic to me. But hey, this is personal preference, choose which ones you like the best.
So that’s it. Grab your brushes and give some color to the minis of your favorite board games. If you are looking to get started, I’d recommend the Army Painter Starter Set as a good option for beginners. It has a nice variety as a reasonable price. Remember, the most important steps here are:
- Choose a primer matching the dominate color you want your mini to be
- Use a quick shade
- Spray seal the final product








Nice, Tony, I really enjoyed reading this. You’ll have to post some of your best labour-of-love miniatures work too !
I try and post them on social media every now and then, but here are a few past projects:
https://twitter.com/BoardGameQuest/status/817036929942306817
https://twitter.com/BoardGameQuest/status/966718700698128385
https://twitter.com/BoardGameQuest/status/1079119747525029888
https://twitter.com/BoardGameQuest/status/825427975483097088
https://twitter.com/BoardGameQuest/status/555728134050684928