Earlier this year, I wrote an article on how to quickly paint board game miniatures. It showed a technique that just about anyone could do to quickly get some color their games’ minis. Today, I’m going to go over another technique that’s even faster and can produce some great results.
Zenithal Priming
If you’ve painted minis before, chances are you’ve heard of this technique. If not, that’s ok to because I’m going to give you a quick tutorial. First, let’s talk about the what before we dive into the how. Zenithal Priming is a way to paint your miniatures based on how they are traditionally viewed. Zenithal, meaning “located at or near the zenith”, is all about painting from above. When you are playing a board game, chances are you are sitting at a table. This means that for the majority of the game, you are looking at the miniatures from above. It’s from this perceptive that that is important for Zenithal Priming.

This technique is also going to work best on “naked monsters”. For what we are trying to accomplish, you are going to want minis without a lot of small details. While this will definitely work on adventurers, vehicles, soldiers or just about any other miniature, we are going to skip painting any details, because we are going for speed here.
So what are naked monsters? That basically means monsters without a lot of extra details that you’d have to color. There are many games that have these types of horrors (Mansions of Madness and Nemesis for example), but for the purpose of this demo, we are going to be focusing on the great area control war game Cthulhu Wars. Their monsters are perfect to hit with just a touch of color.
 So let’s start by looking at how the minis come. Boring colored plastic. Yet color is still used to tell whose faction is whose. And since we aren’t doing full paint jobs, we are going to retain the color. We are just looking for some highlights and shading to make the minis a little less boring.
Before I down into the weeds, I want to say that there are two main ways to do this technique: using spray cans and using an airbrush. Overall the airbrush gives better results (see the example at the end), but it’s probably not worth going out and buying a setup just for this. Using rattle cans still works just fine. I’ll show examples of both.
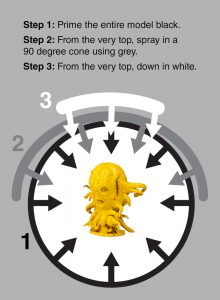
For a quick reference, check out the chart I made here (click to embiggin). That should show you the spray patterns. Note: please let the minis dry between each step.
Step 1: Prime it black.
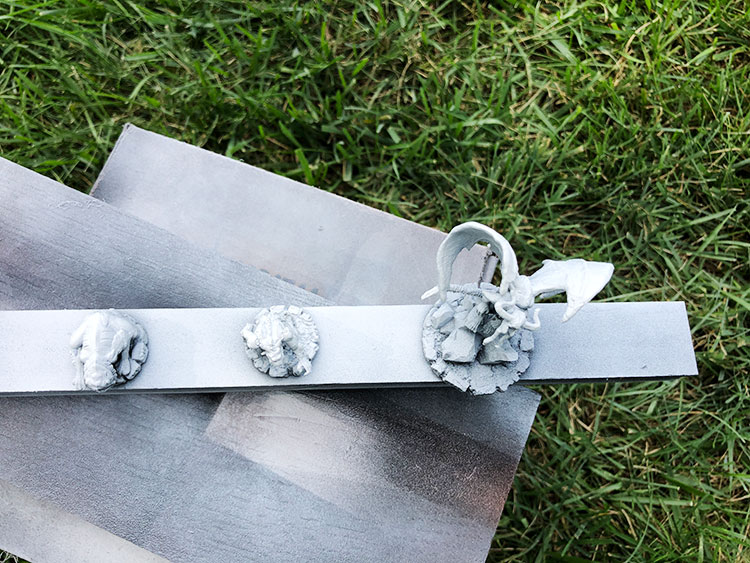
The first step is to prime the mini black. Much like in my last tutorial, I’m using Army Painter spray cans. Feel free to use whichever brand you like, but I’d stick with something high quality and not a $2 can from Home Depot. Our base coat is going to be fully black, so make sure you get the mini from all angles. A good trick is to take some mounting tape and stick the minis to a thin board. Then you can move the minis around when you are priming. If you have a long strip, you can do multiple at once, which is what you want, especially if you have a lot of minis to cover.
Step 2: Spray it grey.
For this step, you are not going to be moving the minis around. Put them down and stand above them. Take your grey spray primer and paint the minis in about a 90-degree cone. You want the tops and sides to be hit with the grey, but definitely not the recessed shadow areas or the bottoms of overhangs (think under an arm). When you are done, the minis should be grey from the tops and sides, but black if looked at from below. Also, you want thin layers here, so don’t overdo it.
Step 3: Spray it white
OK, this step will be really quick. From directly above the minis, you are going to spray down white. If you are using an airbrush, you can hold the minis sideways and spray as well. But the important thing to remember is you are going directly from the top here and want only minimal white on the sides. Plan on hitting the top of the head and the shoulders.
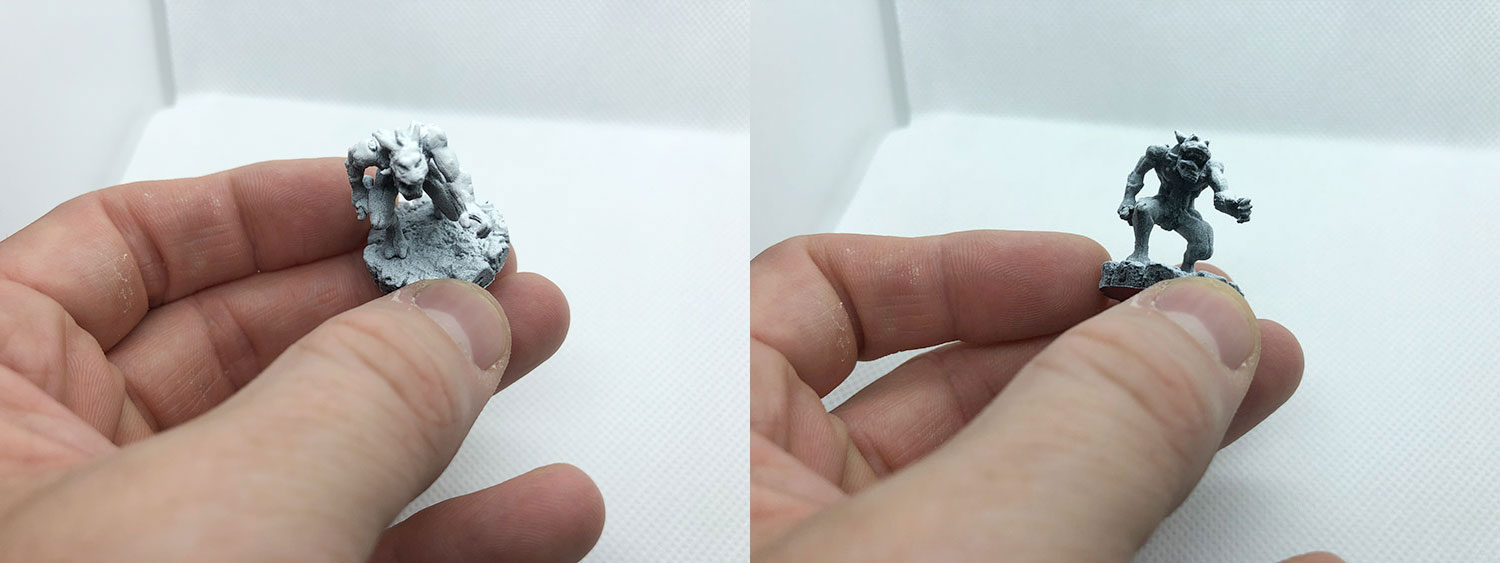
As you can see in the photo below, When viewed from the top, you can see highlights. But when viewed from below, you see dark shading. This is the contrast we want.
If the monsters you are painting need to be grey, you are done! Seal your minis if you want and get to playing.
If your factions or monsters need to be colors, liked in Cthulhu Wars, then we have one more step.
Step 4: Color Wash
Grab your nice set of Army Painter colored quick shades and give each of the minis a wash. If you don’t have the shades, you can also use some thinned paint. Red for red minis, blue for blue, etc… If you have an airbrush, you can use the brush for this step by glazing, but I’ve actually gotten better results with the wash. The airbrush tends to blow around the liquidy paint, and washes have the added benefit of flowing into the nooks and crannies giving you even more shade.
The other thing to keep in mind is how you want to handle the bases. Since we are trying to quickly paint the minis, you don’t want to have to spend a lot of extra time painting the bases. So you have two options. One, you can just wash the whole thing and call it a day. Hey, maybe that monster is standing on a red stone. Or, you can be a little careful near the bottom of the mini. If the monster is standing on grey stone, the Zenithal Priming will look awesome. Just try not to slap too much of the wash on where it pools at the feet. If you are a little careful, you can have some great results. After the wash dries, just throw on some sealer and you are done.
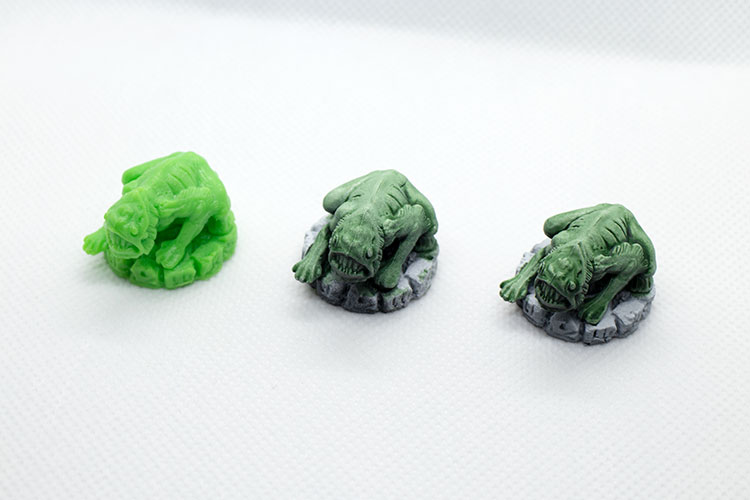
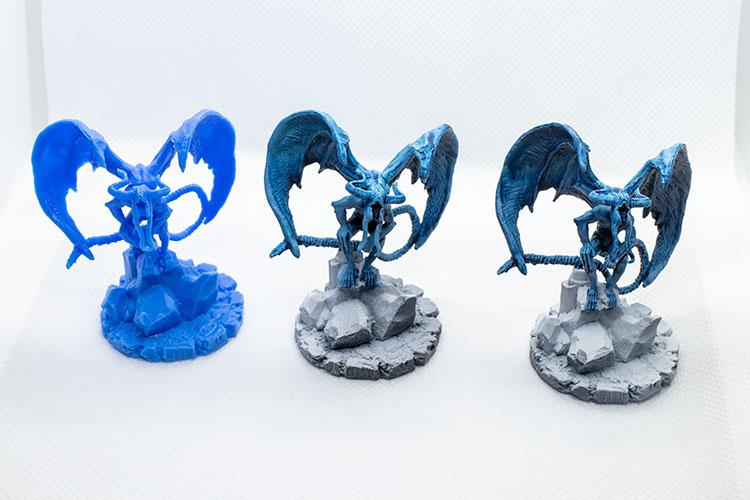
In the image below, the far left is the original, unpainted mini. The center was done with a spray can, the far right is with an airbrush. Both used brushed on shades at the end.
In the image below, the far left is the original, unpainted mini. The center was done with a spray can and a brush wash, the far right is with an airbrush and an airbrush glazing. I also shaded the bases in this one to give you an idea of how it looks. The other downside of using an airbrush for shading is it’s almost impossible to not hit the base unless you mask or are super careful.
In the image below, the far left is the original, unpainted mini. The center was done with a spray can, the far right is with an airbrush. Both used brushed on shades at the end. On the far right, I tried to avoid getting any shade on the base.
Finally, let’s look at the difference between using a spray can and an airbrush (image below). The primary difference will be that an airbrush gives a much smoother result. Notice on the mini on the left (done with a spray can) has a lot of little dots, while the airbrushed mini is all smooth coloring.
While this technique isn’t going to produce as nice of results as the one in my last article (because we aren’t doing any detail work), it is MUCH faster. You can probably paint an entire Cthulhu Wars faction in less than an hour (not counting drying time). Each spray step takes only a couple of minutes and shading takes only slightly longer.
And in my opinion, there is no contest in the difference in quality and look between the original, unpainted plastic minis and these painted ones.








Great job. Army Painter washes (“Quickshade Inks”) in the eye droppers are the best!
this is an amazingly useful tutorial.